|
|
|
|
|
|
|
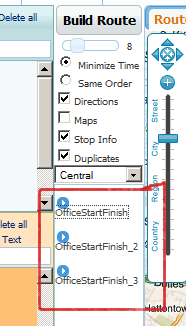
To the left, there is an example on how our route was divided into 3 routes.
Note how officeStartFinish has been split into 3 parts. You can change
the number of split routes by modifying the MaxMinutes and the waiting time at each
stop. In our example, we used a MaxMinutes of 5 hours of driving time (remember
we are also stopping for 20 minutes at each stop). Depending on your route
and the number of hours you plan to travel in one day, you can chose a higher or
lower number of working hours. The same rule applies if you use the MaxStops
instead of MaxMinutes field of the vehicle.
Vehicle's On-The-Road is another must-have feature specially
if you go on long distance trips out of town and plan to visit several stops during
your journey. If you are on the road and you are not coming back to the office
every night then check the On-The-Road in the vehicle page also. When On-The-Road
is checked, your next day starting point will be the last point you visited the
day before.
Suppose we had 9 Stops: A, B, C, D, E, F, G, H, I. Depending on whether On-The-Road
is checked or not, the route will be divided differently.
|
|
On-The-Road Checked
|
|
On-The-Road Not Checked
|
|
Day 1
|
Office->A->B->C
|
Day 1
|
Office->A->B->C->Office
|
|
Day 2
|
D->E->F
|
Day 2
|
Office->D->E->F->Office
|
|
Day 3
|
G->H->I->Office
|
Day 3
|
Office->G->H->I->Office
|
|
|
|
|
|
|
|
|
|
When On-The-Road is checked we do not come back to the Office each day (we are on
the road---maybe staying at a hotel for the night). Notice when it is NOT checked
we loop back to the office at the end of each route.
|